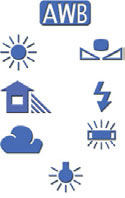
 White Balance is nothing more than an adjustment to get the color you want. You set it to look good on the camera’s LCD and that’s it until the light changes.
Photos can look too orange, blue or green even if the subject looked OK to our naked eyes.
AUTO (also called AWB) mode works OK with flash and indoors and outdoors. Usually the images will still be fairly blue in shade and pleasantly warm indoors at night. When the flash is on most cameras automatically switch to flash white balance.
 Tungsten (symbol of a light bulb also called “indoor”): Very, very blue most of the time except indoors at night, for which it looks normal. “Tungsten” is the name of the metal out of which the bulb’s filament is made. Even indoors many people prefer the warmer AUTO setting. TRICK: Set -1 or -2 exposure compensation and use this setting in daylight to simulate night! In Hollywood we call this “day for night.”
Daylight (symbol of a sun): Bluish normal. This is a little bit bluer than I usually prefer. Only use it for shooting test charts in direct sunlight.
Cloudy (symbol of a cloud): I prefer this. It’s a little warmer than the daylight setting and best for most shots outdoors in direct sunlight. Why not the daylight setting? The camera manuals are written by engineers, not artists. The engineers are interested in copying color test charts, not making a good photo. I prefer things on the warmer side.
Flash (symbol of a lighting bolt): Almost identical to cloudy but sometimes redder depending on the camera. This is optimized for the little on-camera flashes that tend to be blue, thus this setting tends to be warm to compensate. With large studio strobes you probably don’t want to use this, since the images may be too red. Try the Daylight setting to match carefully daylight balanced studio strobes.
Shade (symbol of a house casting a shadow): Very orange. This is perfect for shooting in shade, since shade is so blue. It’s also for shooting when you are under a cloud on a partly cloudy day since most of the light is coming from the blue sky. It’s also for shooting in backlight, again since the subject is lit more by the blue sky instead of the direct sunlight. TIP: Some cameras skip this critical setting. If so, manually set the CUSTOM preset while in shade (also called one-push, Manual and white card and other things depending on manufacturer) and use this setting in place of the missing shade setting. TIP: I often use this mode even in direct sun when I want to make things look warm and inviting.
Fluorescent (symbol of a long rectangle or Fluorescent tube): Use this if your photos are too green or under Fluorescent, mercury, HMI or metal halide lights as you might find in street lights. It will make other things look a bit purplish.
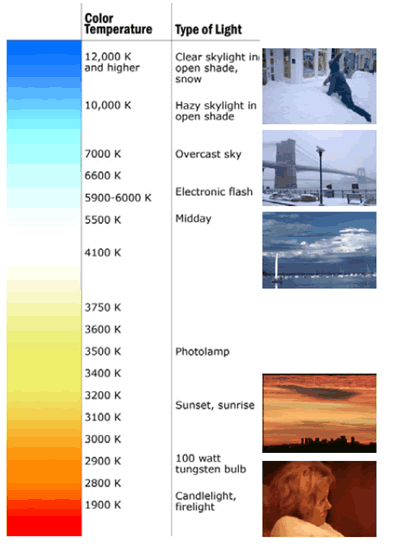
Color temperature lets you select a specific setting from the Kelvin scale. In a studio, where you know the color temperature of the lights, you can set the camera to an exact match. In other settings you can use a color meter to determine the setting you should make.
Manual or Custom lets you set white balance manually by aiming the camera at a piece of white paper or gray card.
Auto, Preset (Daylight, Shade, Cloudy, Tungsten light, White fluorescent light, Flash), Custom, Color temperature setting (2500-10000K)
Sunrise/sunset 2400-3000 Kelvin……………………Use Auto white balance
Tungsten lighting 3200-3500 Kelvin ……………………Use tungsten/Incandescent white balance
Fluorescent lighting 4000 Kelvin …………… Use fluorescent White balance
Early morning/afternoon sun 4000 Kelvin…….Use auto white balance/ –fluorescent white balance
(Magenta filter) to counter greenish cast on skin from foliage if under trees or on really green grass
Noon sun/Sun overhead…5000-6500 Kelvin…………………….use Cloudy White balance
Flash photography in daylight 5500 Kelvin ………………………Use Flash White balance
Deep shade………………….6500 Kelvin…………………………Use cloudy/shade white balance
Shade in daylight 7500 Kelvin ……………………………………Use shade white balance
Heavy overcast, very dark shade 8000 to 10000 Kelvin………Use shade white balance plus 81a-85c glass filter
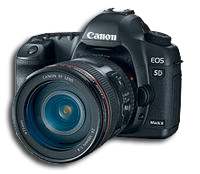
- 3 custom modes (C1, C2, C3)
- Bulb (B)
- Manual (M)
- Aperture Priority (Av)
- Shutter Priority (Tv)
- Program AE aka Intelligent Program (P)
- Creative Auto (CA)
- Full Auto aka “Point and Shoot” (Green Square)
The custom modes allow the user to register a set of camera conditions, such as ISO setting, shooting mode, white balance etc. These can then be instantly recalled in the C1, C2 and C3 dial positions.
